How to Dial In Exposure and Contrast with One Darkroom Test Strip
If your darkroom prints keep looking muddy, flat, or weak in the blacks, this method shows you how to use one targeted test strip to judge highlight exposure, correlate contrast changes, and arrive at a strong silver gelatin print with much less guesswork.
A lot of darkroom printers waste time because they separate exposure and contrast in a way that makes the process harder than it needs to be. They make a test strip, guess at the exposure, make a print, decide the contrast is wrong, then start over without a clear system.
This method is different.
It lets you use one targeted test strip to judge your highlight exposure, read what the shadows are doing, and then correlate the contrast change in a controlled way. When your system is calibrated, you can get both the right exposure and the right contrast from a single strip.
👉 Watch the full video walkthrough here:
At its core, this method is simple: use one targeted test strip to place the highlights first, then read the shadows at that same exposure to decide whether contrast needs to change. When your system is calibrated, that single strip can tell you both where the exposure belongs and how to move the contrast without losing the highlight placement you chose.
What This One-Strip Method Is Designed to Do
This is a practical darkroom printing method for photographers who want to:
fix muddy black and white prints
judge highlight exposure more precisely
understand whether weak blacks are an exposure issue or a contrast issue
use a targeted test strip instead of wasting a whole sheet
dial in both exposure and contrast with a more repeatable system
The big idea is simple: expose for the highlights, then adjust the contrast for the shadows. But this method goes a step further by showing you how to correlate those contrast changes from the strip itself.
What the Test Strip Is Telling You
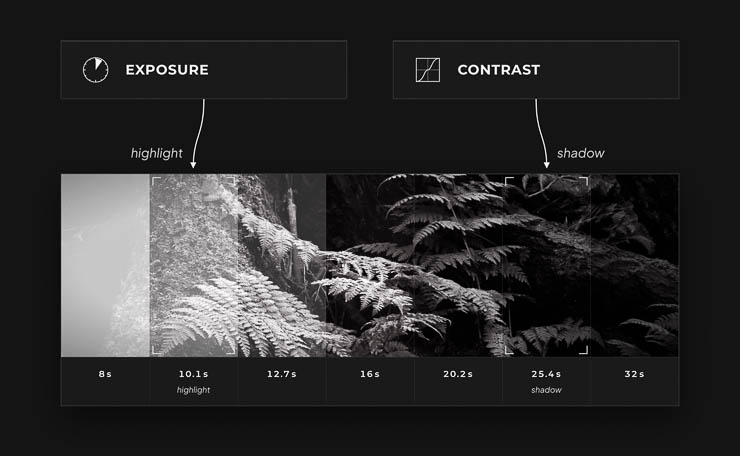
If the highlights are right but the shadows are weak, increase contrast.
If the highlights are too dark, reduce exposure before changing contrast.
If the highlights are too light, increase exposure before changing contrast.
If the blacks get stronger only as exposure increases across the strip, the print likely needs more contrast.
A Quick Note for Beginners
If you are just starting out, the simplest way to learn printing is still to judge your highlights first, get your exposure where you want it, and then turn your attention to contrast.
But once you are comfortable reading a print, this method becomes extremely powerful because it lets you read much more information from a single strip. That means less wasted paper, faster decisions, and a much more deliberate path to the final print.
Step 1: Choose an Important Highlight Area
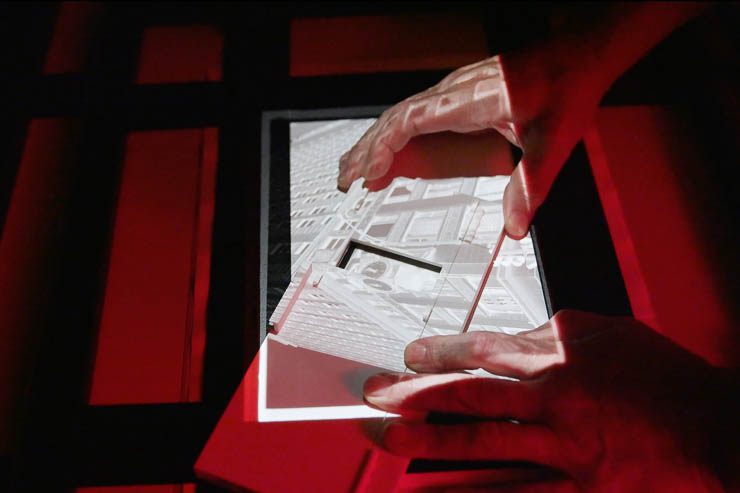
Choose a highlight that actually matters to the print, because that area anchors the whole exposure decision.
The first thing you need to do is choose the part of the print that matters most for your highlight exposure.
In most prints, this should be a meaningful highlight area, not a random bright corner with no importance to the picture. You want to base your exposure on a highlight that actually matters to the image.
That highlight becomes the anchor for the whole method.
If you want a cleaner and more repeatable way to isolate an exact part of the image for testing, the Perfect Test Strip Printer is designed for that kind of targeted evaluation.
Step 2: Start with a Normal or Lower Contrast Filter
For this method, start with a normal or slightly lower contrast filter. A number 2 filter is a very practical starting point, and that is what is used in the demonstration.
You are not trying to guess the final contrast perfectly at this stage. You are giving yourself a stable starting point so you can read the strip intelligently.
Step 3: Build the Test Strip in Third-Stop Increments
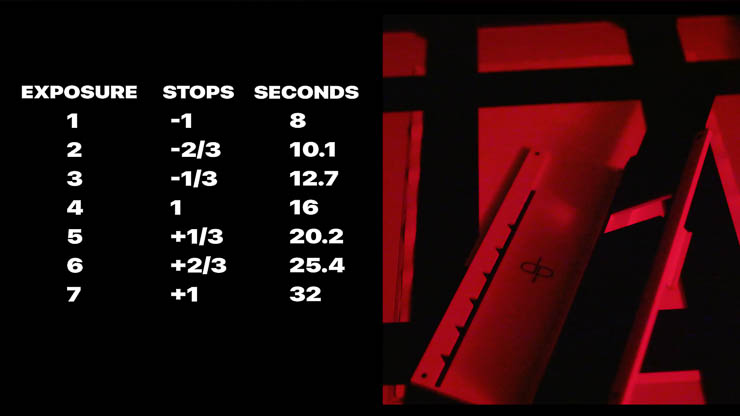
This method uses f-stop printing increments because they give you a predictable, proportional way to judge changes in shadow density.
That does not mean you need an f-stop timer. If you have one, great. If not, you can still do this method using straight time with a linear timer.
The key is the spacing of the exposures.
In this example, the target middle exposure is 16 seconds. From there, the strip is built:
one stop below in third-stop increments
the middle exposure itself
one stop above in third-stop increments
That gives this exact sequence:
8 seconds
10.1 seconds
12.7 seconds
16 seconds
20.2 seconds
25.4 seconds
32 seconds
This third-stop structure is what makes the later contrast read possible.
If you want help building third-stop times quickly, use the Darkroom F-Stop Printing Calculator.
Step 4: Develop, Wash, Dry, and Evaluate the Strip Properly
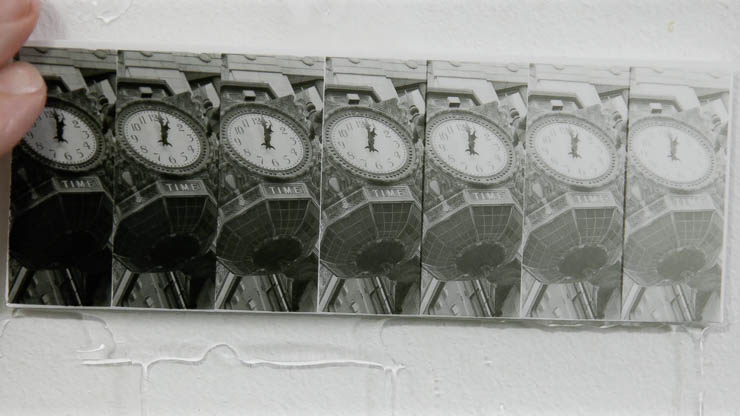
After exposing the strip, process it normally. Develop, stop, fix, wash, and dry it before evaluating the result.
At this stage, your job is not to evaluate the whole image. Your job is to judge the chosen highlight area first.
That is a big part of why targeted strips are so useful. They help you focus on the area that actually matters instead of drowning in irrelevant information from the rest of the print.
Step 5: Choose the Correct Highlight Exposure First
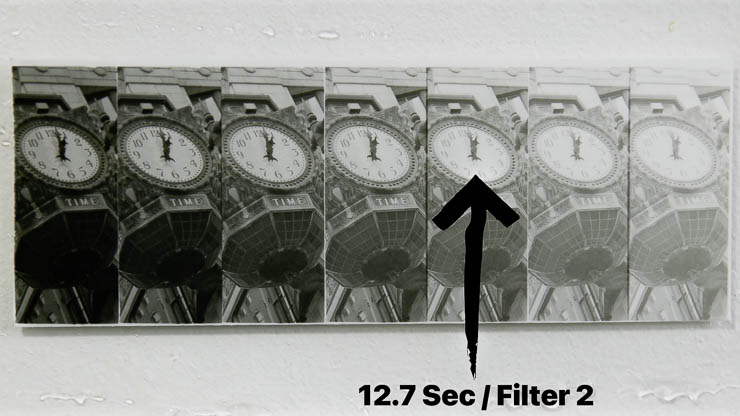
In this example, 12.7 seconds at filter 2 gives the highlight placement we want.
When you evaluate the strip, look at the highlight area you targeted and decide which exposure gives you the highlight you want.
In the demonstration, the best highlight exposure is 12.7 seconds at a grade 2 filter.
That is the first key decision.
The highlights tell you where the exposure belongs. Once you know that, you can use the same strip to evaluate what the shadows are telling you about contrast.
Step 6: Look at the Shadows at That Exact Highlight Exposure
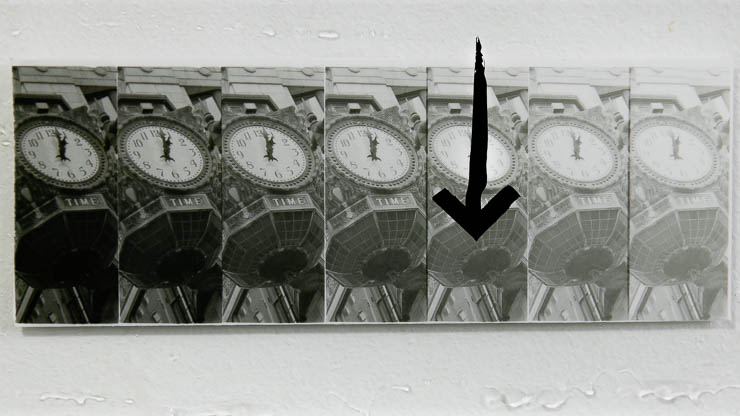
Now that you know which exposure gives you the right highlight, look at the shadows in that same step.
This is where the real power of the method appears.
In the example, the highlights are right at 12.7 seconds, but the shadows are weak. There are no real blacks, and the print lacks contrast.
That means the exposure for the highlights is fine, but the contrast is not high enough to place the blacks and shadows where they need to be.
Step 7: Correlate the Contrast Change from the Strip
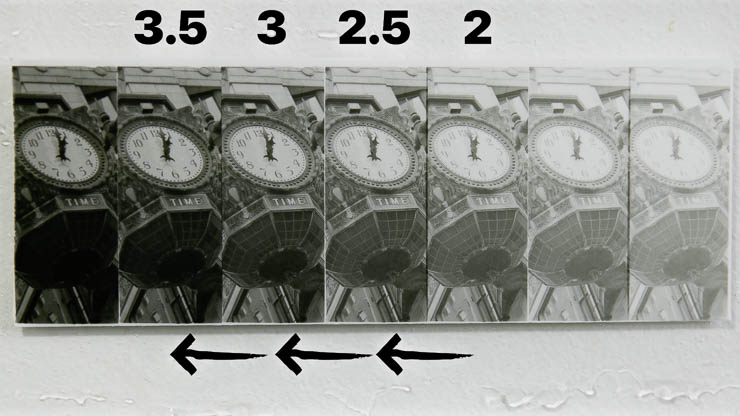
If the highlights are right but the shadows get stronger as exposure increases across the strip, the print likely needs more contrast.
This is the specific technique the post needs to make crystal clear.
If the highlights are correct at your chosen step, but the shadows are weak, look to the left on the strip where more exposure has been given. If the blacks get stronger there, that tells you the print needs more contrast.
Why does that matter?
Because in a calibrated system, each third-stop increase corresponds to about a half-grade of contrast.
So if you move over three third-stop steps, that equals:
one full stop of exposure difference on the strip
roughly one and a half grades of contrast
That is why, in the demonstration, the print moves from a grade 2 to a grade 3.5.
The strip itself is not just telling you “needs more contrast.” It is helping you estimate how much more contrast you need.
If you want a clearer foundation for why highlights and shadows need to be judged differently, read the Zone System guide.
Step 8: Keep the Highlights Consistent with a Factor System
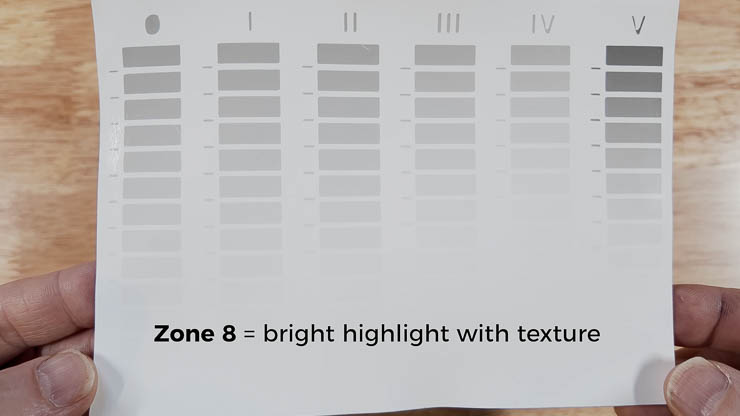
Once you change the filter, you still need to keep the highlight density where you originally wanted it.
That is where the factor comes in.
The factor does not come from the filter number itself. It comes from the difference in exposure time needed to reach the same highlight density with different filters.
In other words, you test your system so you know how much compensation is needed to hold a consistent highlight, often by testing for a Zone VIII highlight through your contrast range.
Then you build a chart or factor system so you know the compensation needed from one filter to the next.
In the example, the compensation factor from grade 2 to grade 3.5 is 1.75.
Step 9: Multiply the Chosen Highlight Exposure by the Factor
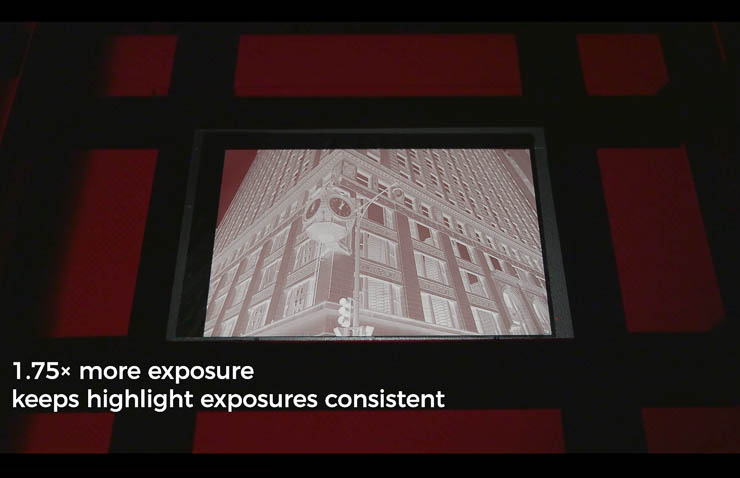
After moving to grade 3.5, multiplying the chosen 12.7-second exposure by 1.75 keeps the highlight exposure consistent.
Now take the correct highlight exposure and multiply it by the factor needed for the new contrast grade.
In the demonstration:
chosen highlight exposure = 12.7 seconds
contrast target = grade 3.5
highlight factor = 1.75
So the final exposure becomes:
12.7 × 1.75 = 22.2 seconds
That means the final print is made at:
grade 3.5
for 22.2 seconds
That is how you keep the highlights where you want them while increasing the contrast enough to place the shadows and blacks correctly.
Step 10: Make the Final Print
Once you move to the new filter and apply the factor, you can make the final print from that one strip’s information.
In the demonstration, that final print produces the exact result wanted:
highlights are where they should be
shadows are where they should be
the print no longer looks muddy or weak
That is why this method is so effective. It gives you a direct path from one targeted strip to a properly exposed, properly contrasted print.
If you want the same kind of control when you change print size later, use the Print Sizing Exposure Calculator.
Why Targeted Test Strips Work So Well
This is the preferred method here for a reason. Over 90 percent of the time, a targeted strip like this is more useful than a broad strip across the whole image.
If you want a cleaner way to make targeted strips like this, see the Perfect Test Strip Printer.
A targeted strip gives you information about the part of the image that actually matters. A broad strip often gives you too much information, much of it irrelevant, and that can make the evaluation more confusing instead of more clear.
That does not mean full-sheet test strips are useless. They can absolutely be the right tool for the right negative. But for most practical printing decisions, especially when the goal is to dial in a critical highlight and read the shadows intelligently, targeted strips are often faster, clearer, and less wasteful.
Calibrate the Method to Your Materials
For the method to be truly accurate, your contrast system should be calibrated to your paper and filters.
That means knowing what filter actually corresponds to what contrast grade with your materials. A number 2 filter may not give a strict grade 2 on every paper, and some paper/filter combinations are less linear than others.
That said, you do not need perfect lab-level calibration before this method becomes useful. In practice, a lot of printers learn the behavior of their paper, filters, and developer over time simply by using the same materials consistently.
If you want maximum precision, test for a Zone VIII highlight through the contrast range, build a compensation chart, and keep it with your printing notes.
See the practical system for getting exposure and contrast under control.
When to Use This Method
This technique is especially useful when:
your highlights are easy to identify but your shadows feel muddy
you want to avoid wasting full sheets of paper
you already know what part of the image matters most
you want a faster way to move from strip to final print
If you later change print size and need to preserve a good starting exposure while scaling your enlargement, the Print Sizing Exposure Calculator can help reduce that guesswork too.
If you want help making exposure adjustments more predictably in the darkroom, the Darkroom F-Stop Calculator is a useful companion tool for this kind of workflow.
About Matthew Koller
Matthew Koller teaches black and white darkroom printing through Dist Photo and Unlock the Darkroom. His work is focused on helping photographers print with more control, less waste, and a clearer understanding of exposure, contrast, and repeatable darkroom workflow.
Darkroom Printing FAQ
What should I look at first on a darkroom test strip?
Look at the important highlight area first. This method is built around choosing the highlight exposure before using the same strip to judge what the shadows are doing.
How do I fix muddy black and white darkroom prints?
If the highlights are correct but the shadows are weak and there are no real blacks, the print usually needs more contrast. This method helps you estimate that contrast change directly from the strip.
How can one test strip tell me both exposure and contrast?
You first choose the correct highlight exposure from the strip. Then you examine the shadows at that exact step. By reading how the blacks strengthen across the third-stop increments, you can correlate the needed contrast change and then compensate to keep the highlights consistent.
Why use third-stop increments on a darkroom test strip?
Third-stop increments create a predictable structure that makes the shadow-density changes easier to interpret. In this method, each third-stop increase corresponds to roughly half a contrast grade (not necessarily a half filter step).
Do I need an f-stop timer to use this method?
No. F-stop printing makes the logic cleaner and more proportional, but you can still use the method with a straight linear timer as long as you build the exposures correctly.
What is a highlight factor in darkroom printing?
A highlight factor is the compensation needed to keep the same highlight density when you move from one contrast filter to another. It comes from testing your materials, not from the filter number alone.
How do I keep my highlights the same when I increase contrast?
Use a factor system. Once you know the correct highlight exposure and the compensation needed for the new filter, multiply the exposure by that factor to maintain the same highlight density.
Are targeted test strips better than full-sheet test strips?
Often, yes. A targeted strip gives you information about the exact part of the image that matters most. Full-sheet strips can still be useful, but targeted strips are usually faster, clearer, and less wasteful for this kind of decision-making.
Final Thoughts
If your darkroom prints keep looking muddy, this method gives you a cleaner way to solve the problem. Judge the important highlight first, lock in the exposure that places it correctly, then read the shadows at that same step. If the highlights are right but the blacks are weak, the print does not need random guesswork. It needs more contrast, applied in a controlled way that keeps the highlight exposure consistent.
That is why targeted test strips are so effective. They let you evaluate the part of the image that matters, see whether the problem is exposure or contrast, and move toward a final print with less wasted paper and a more repeatable workflow. If you want a practical system for getting exposure and contrast under control, see it here.
